Monday, January 28, 2013

Gravy


I braved the 15 degree weather and went up to the Salvation Army on Saturday.   The primary purpose of my trip was to find some colored glassware for a current project.  If something struck my fancy for Young House Love's Unofficial Macklemore Thrift Store Challenge, that would be just gravy.


I only got the gravy.  No taters.  But I got lucky.

Really Lucky.

Here's what I found:

The chair rang in at $12.99 and the fabric was a mere $1.99!  I was within the $20 limit of the Challenge
My initial vision was to reupholster the chair with the excellent deco fabric and paint the legs with a mustard color similar to what is in the fabric. A rich chocolate or black seemed a little safe and less inspired to me.

Thrift store chair

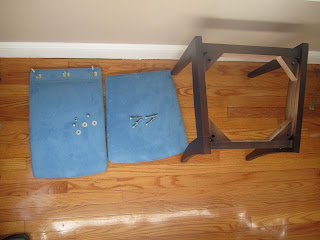
I immediately got to work.  I figured out how to use a socket wrench and disassembled the chair.


Disassembled chair

I anticipated covering the back of the chair would be the biggest challenge of this project.  I even tried to prepare myself for disappointment - - either the cover would be way too loose or way too tight.  I had unpleasant visions of the seam ripper.  I was worried.  

The original cover did not have a seam across the top - only on the sides.  I thought duplicating this folded design would be tricky. So I designed a pattern with a top seam. 

I traced the back onto a piece of tissue paper and then retraced my original pattern onto another piece of paper to add a 1/4 seam allowance, making the final pattern piece. Before cutting the first piece I ensured the print was centered beneath the pattern.


I then removed the pattern from the fabric and used the cut fabric as my pattern for the back piece, matching some of the triangles that would intersect at the side seams.   When the two pieces were finally cut, they were already pinned and ready to sew.

Matching fabric


I sewed the two pieces together using a zig zig stitch and a 1/4 inch seam allowance.  When I slipped the piece over the back, it fit!  Like a glove!  I was so surprised and proud!  The only problem was the zig-zag stitch wasn't quite tight enough.  You could see some of the thread.  I adjusted the settings and stitch, and sewed a straight seam over the existing zig zag.  I couldn't believe it worked out and I didn't have to use a seam ripper. 
I then enlisted my husband's help for stapling the fabric.


I altered the direction of the pattern here for a little extra zing and at the base of the chair.  He cleverly centered the fabric and pinned it so that it would stay in position. After pinning, we secured the fabric with staples on the opposite side.


Then it was time to tackle the base of the chair.  I began by roughing up the surface with a little sand paper and filled two small knicks with wood putty.


Ideally, painting the base of the chair would have been done with spray paint but it's just too darn cold outside and we don't have proper ventilation indoors.  I had to resort to a brush. 
I started painting and realized the mustard color wasn't working for me. 


So I switched to black.
 Much better.


The brush didn't leave as many imperfections as I feared, but there still are imperfections.    I hope to fix them this spring. 


I don't think gravy has ever looked so good!

Macklemore thrift store challenge chair

Macklemore thrift store challenge finished chair profile


Monday, January 21, 2013

Love my Man(tel)

Despite the challenging corner, I love decorating the mantel for holidays.  I always struggle with achieving a cohesive composition, and not two separate arrangements: what's below the mirror and what isn't.

My Valentine's Day mantel this year incorporates some of the same elements I used last year, as well as some new additions.

Here's what it looked like last year:

Valentine's Day Mantel


I love the wreath.  It was inspired by this that I found on Pinterest.

Yes.  It took a long time to make.  A very long time.  But was well worth it.  Not only is it lovely, it's versatile.  It can be used any time of the year, especially if you trade out the ribbon.

Another versatile element is the jewel and button covered cone atop a glass candlestick pedestal I got at Target.  It's just a felt covered cone that I hotglued my grandmother's vintage costume jewelry to.  The cone was also a part of my Christmas mantel.

Vintage jewelry craft

I think this year's mantel is a bit further developed:

Valentine mantel


This year I added the candlesticks that I purchased at a thrift store.  They were brass when I bought them and I spray painted them silver.  I am pleased with how they turned out, and I think the additional silver elements give the mantel a bit more unity.


Also new this year are the felt flowers discovered during more Pinterest trolling.  I made these in two batches.  In the first batch I think I cut the hearts too deep - too much of a point at the bottom.  I liked the second batch a bit better because not only was the point shorter, but the sides of the heart were a bit more rounded.

I was surprised by how much the floral tape really transformed them.  They didn't look much like flowers after I first glued them, but the tape really helped to create more authenticly shaped flowers.

Of course, another take away from this project is the color of the felt...  The really saturated colors did not yield themselves to the same realness more natural and earth tones would.  The inspirational flowers looked more real.  

You may also notice that I only used three heart shapes on my flowers, while the inspiration sometimes used four.

Finally, if you make your own flowers, be careful.  It is very easy to burn yourself while making these little blossoms.


The vintage Valentines are displayed a bit differently this year as well.  I just used painter's tape to adhere them to the cording and hopefully it can be removed without damaging the back of the Valentines.  They're one of my favorite parts of the mantel.


I love the vintage Valentines!  They're so clever and just plain awesome.

Finally, I was surprised by how many temporary hangers hung with poster strips I used to put this together.  They were really helpful and unexpectedly critical.  

Muddin’


When I went to high school in Alabama, a common question amongst my male classmates was, “You goin’ muddin’ this weekend?”


Right now one could practically go muddin’ in our front lawn. 

We seemed to have sprung a leak in the pipe that delivers water to us from the main at the street.  Naturally, we were hopeful that repair would be our town’s responsibility and not ours.

We were mistaken.

Like most other towns in the nation, our research and town officials informed us that as soon as the pipes leave the main it is the homeowner’s responsibility to maintain.  Furthermore, our leak was between the on off shut off mechanism at the street and our home. 

Our nickel would have to pay for the repair. 

I immediately called a plumber we have had do work for us in the past.  After I described the problem to him he said, “Oh no.  You’ll need an excavator or contractor to do that sort of job.”

Yikes.

I then got estimates from four different outfits.  If there are any benefits to having this sort of problem, one was that I could give the company our address and describe the location of the leak, and they could take a look at the problem without either one of use being home.

Every outfit suggested that we replace the entire line with copper, stating that if another problem like this were to occur in the future, two repairs would cost the same amount as replacing the entire line.  For kicks, I did ask that the first company quote us both – repair and replacement.  After that, we only sought the replacement cost. 

So here’s where they came in:

Outfit #1 – A landscaping company that also does excavation
¾” copper pipe repair - $1700
¾” copper pipe replacement - $3200
Included: screen loam, grade, fine rake, seed, fertilize, and lime in both quotes
Method: Foundation

Outfit #2 – An excavating company
¾” copper pipe replacement - $2150
1” copper pipe replacement - $2270
Optional: $500 to seed and loam
Method: Foundation

Outfit #3 – General contractor that also does excavation
1” copper pipe replacement - $3250
Method: Foundation

Outfit #4 –An excavating company
1” copper pipe replacement - $2400
Included: Seed and loam
Method: Foundation

Variables:
Some vendors included loam and seed in their estimates, while others did not.
You can elect to go through the exterior wall or through the foundation in the basement.  We chose to go through the foundation, as we felt this would provide greater frost protection. 
We decided to go with the 1” as that will yield better water pressure. 

Besides the price, my husband was also partial to Outfit #2 because this was the only vendor either one of us met initially.  My husband liked him.  My husband trusted him.  Needless to say, I did point out the irony of all that… his complaining that he did not want to have to take off work to accompany these guys on a quote and in the end, the one guy he did accompany had an advantage.  

Moving on. 

When we later requested that Outfit #2 provide us with a quote for 1” pipe, it took days to deliver.  I despise chasing people to give them my business.  It should be the other way around.   They lost us. 

So, after meeting Outfit #4 in person, reviewing the job, and liking him, we are going with #4.  No doubt the yard will look worse for wear until this spring when it can be seeded once again.  Sadly I think our neighbors are growing accustomed to incomplete projects at our house, as evidenced by the the photo taken below in October, but that’s another post.  Our biggest concern is that the Japanese maple we planted this fall will have to be moved.   Hopefully its being dormant will provide some protection.  I sure hope they’re gentle with our little beauty on the left.


All of the quotes included calling Dig Safe and securing the necessary permits.  Once that is taken care of, the repair will begin.   #4 assured us it will be just a day job and therefore, we won’t be without water.  It stinks that we need such an expensive, disruptive repair, but it’s better it's necessary before we have really gotten the yard where we want it.  We have big plans.  

Let's hope this was the last weekend you could go muddin' in our yard.